
Hello dear student,
Here is a summary of the golf techniques I teach. I added a lot of information, because I think it is best to give all the technical information right off the bat. There will always be time to work on the information we have not seen yet. 😉
CONTENTS
IMPORTANT POINTS TO REMEMBER FOR ALL TECHNIQUES. 4
The foot position for each technique. 6
The Golf Posture (Japanese salute, knees bent, arms hanging down) 6
1.1 THE ADDRESS POSITION FOR THE PITCH.. 6
1.2 THE ADDRESS POSITION IS DIFFERENT FROM THE IMPACT POSITION.. 7
1.2.1 How to “cock” the wrists. 7
1.3 THE PITCH TECHNIQUE (like making a stone ricochet on water with the trail hand) 8
1.4 IMPORTANT POINTS TO REMEMBER DURING THE SWING.. 8
1.5 HOW TO SWING BETTER AND BETTER EVERY TIME: THE ROUTINE. 8
1.5.1 Adjust swing speed (tempo) to distance to travel 9
1.6.1 A PERFECT DRILL FOR A PERFECT SWING.. 10
Japanese salute in namaste drill 11
Combine the three drills above (without a ball). 12
The Opposite of Scooping Drill 12
2.3 THE ADDRESS POSITION FOR A HALF SWING STRAIGTH SHOT. 13
2.3.1 When and How to “cock” (hinge) the wrists. 13
2.4 THE HALF SWING TECHNIQUE. 13
2.5 IMPORTANT POINTS TO REMEMBER DURING THE SWING.. 14
Iron to the shoulders Drill 15
Feet Together Half Swing Drill 15
Clipping Several Broken Tees in a Row Drill 15
Three pumps with cocked wrists Drill 16
Three taps with the trail toes on finish Drill 16
Various Trajectories Drill (especially for a beginner) 16
2.7 OTHER INTERESTING POSTS. 16
2.8 PATIENCE AND TIME DO MORE THAN FORCE OR RAGE. 16
3.0 TEEING OFF WITH THE DRIVER. 18
3.2.1 When to cock the wrists for the tee shot with the driver. 18
3.3 THE ADDRESS POSITION FOR A HALF SWING STRAIGTH SHOT. 18
3.4 TEEING OFF TECHNIQUE WITH THE DRIVER. 19
3.5 IMPORTANT POINTS TO REMEMBER DURING THE SWING.. 20
Super-slow motion for proprioception Drill 20
Three taps with the trail toes on finish Drill 20
3.7 BETTER A SLOW THAN TOO FAST TEMPO.. 21
4.1 THE ADDRESS POSITION FOR THE CHIP. 22
4.3 SUGGESTED DRILLS Guess Your Chip Distance Drill 22
Combine the Flamingo and Humming drills above. 23
5.1 BLAST BUNKER SHOT FOR GREENSIDE BUNKERS. 24
Two Lines in the Sand Drill 24
5.2 GETTING OUT OF A FAIRWAY BUNKER. 24
7.0 BEFORE GETTING ON THE COURSE. 24
8.0 THE TRANSITION AND WEIGHT TRANSFER. 25
10.0 WEAK OR STRONG GRIP? (hands turned on the handle without closing or opening the blade) 25
11.1 The centrifugal force created by the body turn makes the arms move. 25
Moving the arms with body rotation Drill 25
11.2 The momentum to throw the arms to the top of the backswing. 25
11.3 The club lag in the transition phase makes the arms whip. 26
11.4 The weight shift on the lead leg facilitates the follow through. 26
Throwing a soccer ball at the ground Drill 26
11.5 The gravity helps the arms drop. 26
Brush the Turf Back and Forth Drill 26
INTRODUCTION
IMPORTANT POINTS TO REMEMBER FOR ALL TECHNIQUES
- Place the “6th finger” of the leading hand securely on top of the grip so that the wrists are free to move. See The grip.
- Beware of an upright posture. Lean the torso towards the ground, bending the hips and knees slightly to bring the weight under the soles of the feet. There should be some space between the thighs and the hands for the arms to swing freely. Do not stand up during the swing.
- Always do the routine to have a perfect “timer” allowing “Willy” to be fully lit before the triggering of the swing, both on the driving range and on a golf course, for all techniques: putting, chipping , pitching, fairway shots or shots in the rough, tee shot, bunker shots, shots in the wood 😉. I recommend incorporating a few slow swings into the routine to loosen up the muscles before setting up in front of the ball.
- Do not scoop the ball. On a mat (preferably not shaggy), place the ball in the hole of the rubber tee to promote a downward swing. Do not bend the elbow of the lead arm during the backswing (risk of toping on the downswing). Be careful to have the front wrist arched on impact, which reduces the angle (“loft”) of the club face at impact, resulting in a lower trajectory than a “scooped” ball. Watch out for the inverted C finish (hollow back at the end of the swing), which is damaging to the lower back.
- To add fluidity to the swing and improve rhythm, do short continuous back and forth swings aiming at the base of the rubber tee on a golf mat. Perform the exercise in The flamingo position (the trail foot on the tips of your toes). You can even add The Bumblebee Drill (whisper of the voice that must not fluctuate).
- Make the workouts “fun” with challenges, targets to reach and lots of drills.
- Do not just hit balls in bursts without thinking in between or without “diagnosing” your mistakes. You must find solutions to improve yourself, otherwise you will fall prey to bad habits.
- For intermediate or advanced golfers, practice making different trajectories (lines and curves) to find the happy medium of a straight trajectory; to do this, vary the position of the “steering wheel” (forearms crossed more or less or not crossed at all on impact and post-impact positions). Take a static post-impact position to fully stretch the arms towards the ground to feel the muscular sensations of a downward swing.
Good practice makes perfect. So, train at home and on a driving range regularly (with or without a ball), that is two or three times a week.
No clubs yet? Read What Club Set Should I Buy?
A Bit of Golf Terminology
The lead side of your body is the target side: the left side for right-handed golfers (or right side for left-handed golfers). Therefore, the lead hand is the left hand for righties, but the right hand for lefties. Similarly, le trail hand is the right hand for righties, but the left hand for lefties. See the definition of the main golf terms on my website.
PREREQUISITES
The swing engines
| Rotary Engines | Pivots | Weight Shift | Techniques | Clubs | |
|---|---|---|---|---|---|
| SHORT GAME | Torso turn and pelvis turn as a single block (no coil) | On the lead leg only | No or Very Little | Chip, pitch | Irons and wedges |
| LONG GAME | Pelvis Turn (large engine) and Torso Turn (small engine) (with coil) | On the trail leg for the backswing, on the lead leg for the downswing | More shift towards the target on the lead leg for the downswing | Half swing, full swing, tee shot | All clubs |
| BUNKER SHOTS | The torso turns, the pelvis follows | Very little, to steady the feet in the sand | No Very little | Greenside bunker Fairway Bunker | Wedges Irons and Fairway Woods |
| Beginners generally lack pelvic and torso rotation as well as weight transfer. They overuse their arms. Maintain an arm-torso CONNECTION at least until impact. |
Watch the video on the arm-torso connection.
The address setup (static fundamentals) of each technique
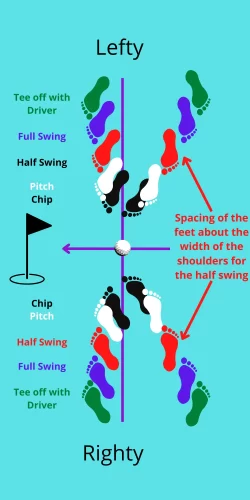
| Foot line (Alignment) | Grip | Posture | Position of the ball | Position of the blade (Trajectory) | Foot spacing (Stance) | |
|---|---|---|---|---|---|---|
| CHIP | 30° open | Weak, firm | Vertical | Facing the trail breast | Square | Width of a foot |
| PITCH | 15° open | Weak, relaxed | Vertical or Inverted K | Facing the lead breast | Square | Length of a foot |
| HALF SWING | Square | Neutral, relaxed | Inverted K | Facing the lead breast | Square | Shoulder width |
| FULL SWING | Square or a little closed | Neutral or strong, relaxed | Inverted K | Facing the lead breast | Square (straigth) Open (slice) Closed (hook) | Wider than the shoulders |
| TEE OFF WITH DRIVER | Closed from 10 to 15° | Strong, relaxed | Pronounced inverted K | Facing the lead armpit or shoulder | Square (straigth) Open (slice) Closed (hook) | Wider than the shoulders |
The foot position for each technique
The Golf Posture (Japanese salute, knees bent, arms hanging down)
The posture is low, the knees and hips are bent forward. This allows the torso to get closer to the ground and creates space between the hands and thighs so you can swing freely your arms and hands.
The motors of the swing are the pelvic turn and the torso turn (also called shoulder turn), while the whip is the arms and the club shaft, but no arm effort is required for the whip to crack, since the gravitational force created by the motors do the job.
In fact, to create more turn, simply push against the ground with the legs on the downswing to help move the pelvic towards the target: “It’s the dog that wags its tail, not the tail that wags the dog.”
The Grip
Be sure to place the “sixth finger” of the upper hand (the left for right-handed golfers) on top of the club handle. To do this, tuck the lead elbow in and break the lead wrist outward.
In fact, the “sixth finger” is the end of the ulna, which is the end of the forearm bone that forms a bump at the base of the hand on the side of the little finger. Watch the video on the grip on You Tube.
The Golf Glove
A golf glove in the lead hand helps prevent blisters. Personally, I prefer to have both hands gloved on, but that is quite rare among golfers.
A) BEGINNER LEVEL: THE 3 BASIC TECHNIQUES
1.0 PITCHING
Pitching is a short game technique creating high ball flights around the green to fly over obstacles such as green bunkers, water hazards, rough (tall grass), etc. Thanks to this technique, your ball will land softly on the green with minimal roll, hence a short putt for your next shot. Such is the secret for low scores. Pour le pitch, on utilise habituellement un cocheur (wedge). However, for learning purposes and the development of sound swing mechanics, I suggest you pitch with all the clubs in your golf set, except the putter.
1.1 THE ADDRESS POSITION FOR THE PITCH
- Weak grip: the line formed by the junction of the thumb and forefinger points to the chin for both hands.
- Flared out lead foot (toes pointing slightly towards the target).
- Stance : feet less than shoulder width apart.
- Line of feet pointing left of target (for right-handed golfers), but blade pointing directly at target.
- K Posture; The ball is facing the lead breast (the left one for right-handed golfers). The lead arm is lightly pressed to the side of the lead breast, while the trail arm is beside the trail breast.
- The blade rests on its heel, the handle points towards your belt buckle; your hands are a closed fist distance from your thighs; the shaft of the club forms an angle of less than 180 degrees with your arms.
Watch the video on the address setup for the pitch.
1.2 THE ADDRESS POSITION IS DIFFERENT FROM THE IMPACT POSITION
In the forementioned address position, you will be close to your ball, with your torso leaning towards the ground:
- Bring the handle towards the lead thigh so that the shaft of the club forms a straight line with the lead arm, then lean the torso from the hips to lower the handle so that the blade rests on its heel. The shaft of the club then forms an angle of less than 180 degrees with the lead arm for an observer behind the target line.
- Your pelvis and shoulders are “square” (parallel to the target line).
However, in the impact position:
- the blade will be flat on the ground,
- the club shaft and the lead arm will form a straight line for an observer behind the target line,
- your pelvis and shoulders will be “opened” (pointing left to the target for righties).
- your trail heel is slightly off the ground and your trail foot has started to pivot from the base of its big toe towards the target.
The post-impact position comes right after:
- After hitting the ball, the club continues to travel until both arms are fully extended towards the ground in front of the ball. In other words, the trail elbow has finished unfolding.
1.2.1 How to “cock” the wrists
Take the address position and the right grip. Do a small backswing turning your back to the target and “cock” your wrists so that you form a 90 degree angle between the front arm and the club shaft. The lead arm is straight (its elbow is not bent), but the trail arm is bent at the elbow. The wrists are fully cocked if the shaft of the club and the lead arm form an “L” at the end of the backswing.
Watch the video on how to cock the wrists.
1.3 THE PITCH TECHNIQUE (like making a stone ricochet on water with the trail hand)
- Fully cocked wrist on takeaway (beginning of the backswing) or in response to the momentum.
- Head still, nose pointed towards the ground all the time (do not watch the ball fly away). Read the post Keep your eyes on the ball! Nevertheless, many seconds after reaching the finish position, you can turn your head to look at the result if you don’t stand up. To do this, get used to looking at the horizon sideways: you are a golfer, not a spectator. Watch the video on how to move the head.
- Side bend finish (trail shoulder points towards the ground where the ball sat) and the blade is close to the ground since not “scooping” action with the wrists, elbows, or pelvis to help the ball up occurred. See the post Topping the ball: the cure.
1.4 IMPORTANT POINTS TO REMEMBER DURING THE SWING
- Your lead heel should not lift, because the lead foot is your anchor to the ground; the anchor allows you to have a solid, reliable, and repeatable swing at will.
- The trail elbow bends on the backswing, but not the lead one.
- No elbow bends at the end of the swing (called the “finish”).
- Do not “scoop” the ball, that is, try and lift it with a movement of the wrists, elbows, or pelvis. Rather, swing down and let the angle of the blade (the “loft”) lift the ball.
- The trail foot should be silent; to do this:
- At the start of the downswing, draw the trail knee towards the lead knee and then pivot at the base of the big toe of the trail foot.
- Finish on the tip of the toes of the trail foot.
- Swing with an inverted empty basket of balls leaning against the trail heel without moving the basket. You can replace the basket with a long tee planted in the ground.
1.5 HOW TO SWING BETTER AND BETTER EVERY TIME: THE ROUTINE
- WILFRED AND WILLY
See the post Wilfred and Willy on my website to understand how to use the two cerebral hemispheres during the routine.
- THE ROUTINE
Make sure you follow the WWW (Wilfred-Willy-Wilfred) routine starting with the alignment far behind the ball.
Read the post Golf Fundamentals on my website and watch the videos in this post.
As the name suggests, the routine should always be the same, including the number of practice swings, to install a timer in the brain so that Wilfred turns off and Willy turns on when you are ready to swing the club.
To fully turn Willy on, turn the head to “stare at the target” several seconds before swinging.
- THE FINISH : the most important moment of the routine
The final position, known as the finish of the swing, is the “crime scene“, the only time when you can choose something to improve on the next swing, provided you stay still and carefully analyze your final position and, more particularly, how it feels. That is why it is so important to stay still, without undoing the finish posture or stand up, otherwise you would “contaminate the clues“.
Since the bodily sensations disappear in seconds, do not focus on the flight of the ball: it is imprinted on your brain anyway. When finishing the swing, you must first and foremost pay attention to the bodily sensations.
Your best weapon in golf is proprioception, which is awareness of the various parts of your body in space. Learning to swing a golf club is like learning to eat with a spoon. At first, you cannot find your mouth (the golf ball), but over time, even with your eyes closed, you can bring the spoon to your mouth (the blade of the club to the ball). Obviously, if you have your eyes open, hand-eye coordination adds precision to the movements.
In addition, the fact of remaining still at the end of the swing improves your balance and, therefore, your consistency in golf. For more on this, see my post on golf balance.
After staying still for several seconds at the end of the swing, you will have plenty of time to find remedies to improve the next swing, for example:
- before doing the routine again (hitting another ball), do some super slow motion swings with no ball to reprogram your brain so you can correct or improve your next swing.
- do some drills to perfect your swing mechanics.
1.5.1 Adjust swing speed (tempo) to distance to travel
For all short game techniques (putt, chip, pitch), you must find the right tempo.
- A slower tempo produces a shorter backswing and therefore less speed on impact, resulting in less distance.
- Conversely, a faster tempo produces a longer backswing and therefore more speed on impact, resulting in greater distance.
1.5.2 Your inner tempo
“Changing” the speed of your swing is not easy. In general, beginners find it very tough to slow down and shorten their swing. That is why they struggle to pull off very short approach shots. Their ball goes too far.
1.5.3 My tip
Use a metronome app on your cell phone.
- Set the time signature to 2 beats (2/4).
- Set the tempo to 60.
- The first beat is the top of the backswing, while the second beat is the impact.
1.5.4 Last tip on tempo
Try different tempos, slower and faster. Once you have found the right tempo, modulate the length of the backswing to produce various distances. During the descent, be sure to deploy the same effort, regardless of the distance, because it is the length of the backswing that will determine the length of the descent and, therefore, the speed of the club at impact. In other words, do not hit harder to hit farther; instead, lengthen your backswing while always keeping the same tempo: tick, tock. If you need to hit farther, pick a stronger club instead.
Watch the video comparing the short pitch with the long pitch in slow motion.
1.6 THE DRILLS
What is a drill? This is an exercise with specific instructions that help you integrate good posture and / or good movement. Each drill targets one or more parts of the body. So, you need several drills to cover all the movements that create a given golf technique (pitch, half swing, tee shot, etc.).
1.6.1 A PERFECT DRILL FOR A PERFECT SWING
The secret to a perfect swing: a perfect post impact position!
There, I have just made you more confused, because after telling you that the end of the swing was the most important moment for the analysis of your swing, here I am telling you that it is the post impact position that will make you swing your club perfectly. Yes, perfectly towards the ground, and not towards the sky.
In fact, I just want you to settle into the post impact position for several seconds, in perfect stillness, to memorize all the feeling of this position:
- your pelvis and shoulders are “opened” (oriented to the left of the target for right-handed people),
- your trail heel is slightly off the ground and your trail foot has started to pivot from the base of its big toe towards the target,
- both arms are fully extended towards the ground in front of the ball on the target side.
- The club face points either towards the sky (slice), or towards the horizon (straight ball), or towards the ground (hook).
By fully memorizing the post impact position, your “Willy” will intuitively make all the correct movements of the backswing, transition (change of direction), downswing and impact, all the way to the post impact position. The result: a well-hit ball every time!
1.6.2 SUGGESTED DRILLS
Japanese salute in namaste drill
With hands folded in namaste, give a Japanese salute, then bend your knees slightly. Press your hands above your kneecaps and push with outstretched arms to straighten your upper back. Finally, let your arms hang loose. This is the athletic posture of golfers.
The two engines drill
In golf posture, club-less, arms crossed over shoulders, rotate the navel at 8 a.m. (4 a.m. for lefties) by pivoting at the base of the big toe of the trail foot so the trail heel lifts till the trail sole is pointing away from the target and only the tip of the toes of the trail foot remain on the ground. Add an inverted empty basket of balls leaning against your trail heel. Repeat the rotation movement without moving the basket.
The steering wheel drill
Learn to control the blade and, therefore, the direction of the ball’s trajectory, doing mini-swings with the lead hand only. It is like a steering wheel: if you turn your left hand to the left (for righties), the blade closes and directs the ball to the left. Similarly, if you turn your left hand to the right (for righties), the blade opens and directs the ball to the right. Repeat this exercise with the other hand.
The waggles drill
Feel the relaxation of the wrists by doing “waggles”.
Club behind the back drill
Feel the slight pressure on the handle: to do this, bring the club behind your back by passing your arms above your head, then hold the grip barely tight so that the club does not fall. Such is the right grip pressure to apply for the pitch.
The flamingo drill
Pitch on the lead foot in the flamingo position (with the trail foot resting on the tips of its toes) to feel the absence of weight transfer during the swing. The weight is always on the lead foot, it is not transferred to the trail foot during the backswing. Watch the drill on the lead foot.
Brushing the grass drill
In a flamingo position, without a ball, brush the grass back and forth in front of the lead foot. This is the impact zone, which begins where the ball lies and continues past the ball in a downward motion. On a golf mat, you can do the same perpetual swing by aiming at the base of the rubber tee.
Take the opportunity to let your wrists cock themselves in response to the rotation of the body; to do this, the wrists must be very relaxed. In other words, let the momentum cock your wrists.
The Bumblebee Drill
Like Jack Nicklaus, perform pitches while whispering. The whisper should neither cease nor fluctuate in intensity, indicating that the swing is fluid and relaxed.
Combine the three drills above (without a ball).
The Opposite of Scooping Drill
Correct the scooping by taking the following final pitch position for several seconds: arched lead wrist, two arms fully extended, sternum pointing towards the ground, pelvis and shoulders turned towards the target, trail heel raised. Then reproduce this position with pitch swings without a ball, then with a ball. Always stay still at the end of the swing, without standing up. Watch the video on impact using a small foam football.
2.0 THE HALF SWING
The half swing is a long game technique. The half swing gives you more control than the full swing. Better a short swing than a too long one which can make you lose your balance and therefore compromise the quality of the impact. Half swings can be made with any of the clubs in a golf set, except the putter, but the technique is most commonly used with irons and hybrids. The half swing makes it easy to develop the right sequence of movements for a fluid, reliable and efficient golf swing.
2.1 HALF SWING POSTURE
The half-swing posture is almost the same as for the pitch, which we saw in the first lesson. The posture is low, the knees and hips are bent forward, but the feet are more apart than for pitch and their alignment is parallel to the flight line of the ball (also called target line).
2.2 THE ADDRESS POSITION FOR A HALF SWING STRAIGTH SHOT
- Neutral grip : the line formed by the junction of the thumb and forefinger points to the trail clavicle (the right clavicle for righties) for both hands.
- Flared out lead foot (toes pointing slightly towards the target);
- Stance : feet shoulder width apart.
- Line of feet parallel to the target line.
- K Posture; The ball is facing the lead breast (the left one for right-handed golfers). The lead arm is lightly pressed to the side of the lead breast, while the trail arm is beside the trail breast.
- The blade rests on its heel, the handle points towards your belt buckle; your hands are at a closed fist distance from your thighs for irons, but at an opened hand distance for woods; the shaft of the club forms an angle of less than 180 degrees with your arms.
2.2.1 When and How to “cock” (hinge) the wrists
Cock the wrists gradually for the half swing, as opposed to cocking them very early for the pitch, but fully cock them for both the pitch and the half swing. The wrists are fully cocked if the shaft of the club and the lead arm form an “L” at the end of the backswing.
Watch the video on how to cock the wrists.
2.3 THE HALF SWING TECHNIQUE
On a mat, you can also place the ball in the hole where the rubber tee is normally located (which you will have removed).
Three pumps with cocked wrists Drill
To overcome the urge to throw your arms too early against the ball, do a backswing followed by three successive partial downswings. In other words, throw the butt end of the grip towards the ball instead, bringing your sternum to face the ball, but stop the downswing when the grip is in front of the ball. At this point in time, the wrists remain fully cocked. Return to the top of the backswing at least twice before hitting the ball and continuing the forward swing until the finish. Note that the backswing is done by turning the back to the target and raising the arms slightly and that the wrists remain cocked all the time, except for the last downswing followed by the impact. Do this drill slowly.
Three taps with the trail toes on finish Drill
To check if the weight is transferred to the trail foot at the end of the swing and to improve your balance and, therefore, your consistency in golf, slowly tap the ground three times with the tip of the trail toes at the end of the swing.
Various Trajectories Drill (especially for a beginner)
Don’t wait until you regularly produce straight trajectories or have mastered golf techniques before practising curved trajectories. Practice making different (curved) trajectories to find the happy medium of a straight trajectory; to do this, vary the position of the “steering wheel” (forearms more or less crossed or uncrossed at impact) in the static follow-through position. Take advantage of the static follow-through position to stretch your arms out towards the ground, so you can feel the muscular sensations of a downward swing and the final position of the club blade. Just because you’re new to golf doesn’t mean you should neglect directional control. You’ll never understand how to produce a straight trajectory if you don’t try to produce trajectories to the left and to the right. What’s more, the direction in which the ball flies will always remain a challenge for golfers of all levels, which is why it’s so important to train yourself to master it.
2.7 OTHER INTERESTING POSTS
2.8 PATIENCE AND TIME DO MORE THAN FORCE OR RAGE
Be aware that 80% of beginners give up golf in the first year because their expectations are unrealistic.
Golf is a very technical precision sport. Be patient and kind to yourself. In fact, the beauty of golf is the ability to keep improving. For that, you dare to play, regardless of your level of play and, above all, to spend a little time on the driving range and on the practice greens. Golf is the project of a lifetime, not an immediate goal.
Do not care about performance. Instead, focus on the pleasure of being in good company. Concentrate on the small victories: there are many throughout a golfer’s life, because you can always improve your golf swing, no matter how old or how experienced you are!
2.8.1 SMART PRACTICE
The first step in improving golf is to improve your swing mechanics. To do this, you need to have a good “game plan” at the practice range. See the smart practice article on my website.
3.0 TEEING OFF WITH THE DRIVER
The tee shot with the driver is undoubtedly THE preferred long game technique for golfers. What a joy to hit far, for as long as it is straight … I repeat, better a short swing than a too long one which could jeopardize your balance and therefore compromise the quality of the impact. There is no point in trying to hit hard, as the outcome will be disappointing most of the time. Instead, focus on rhythm and tempo with moderate effort. In fact, the tee shot has little to do in the final score, barely 14% all shots played!
3.1 THE DRIVER POSTURE
The posture, as always, is low, but not as low as for the other techniques: the knees and hips are therefore a little less bent. As for the feet, they are more apart than the width of the shoulders, because we want maximum weight transfer to gain distance. The alignment of the feet can be closed slightly. Since it is lying on a tee, the ball is further forward, as the impact occurs on the upswing. The ball can therefore be in front of the armpit, or even the front shoulder and even beyond with a very high tee. The hands hang less than with the half swing. They are an open hand distance from the thighs or more if the posture is more vertical. In the pitch and the half swing they are directly below the shoulders, but with the driver they are more under the chin, if not slightly beyond.
3.2 When to cock the wrists for the tee shot with the driver
We cock the wrists late for the tee shot. In fact, at the start of the backswing (the takeaway), it is important to turn the torso so as to place the upper body as far as possible behind the ball, but without lateral sliding of the pelvis. In other words, the lower body rotates as if it were inside a barrel, while the upper body wraps around the trail leg. Start cocking the wrists as the lead arm pass parallel to the ground. This is called the 3 o’clock small circle position: an imaginary circle that encompasses the hands and blade seen behind the target line by a spectator halfway up in the backswing.
3.3 THE ADDRESS POSITION FOR A HALF SWING STRAIGTH SHOT
- Strong grip : the line formed by the junction of the thumb and the forefinger points to the trail shoulder (the right shoulder for righties) for both hands.
- Flared out lead foot (toes pointing slightly towards the target);
- Stance : feet wider than shoulders width.
- Line of feet: slightly opened to the right of target line for righties (to the left for lefties).
- K Posture somewhat exaggerated. The ball is facing the lead armpit (the left one for righties), possibly the lead shoulder or beyond with a higher tee. The lead arm is lightly pressed to the side of the lead breast, while the trail arm is beside the trail breast.
- Very high tee in front of the lead foot.
- The club head rests on its heel, the handle points towards your belt buckle or a little above; your hands are at an opened hand distance from your thighs; the shaft of the club forms an angle of less than 180 degrees with your arms.
3.4 TEEING OFF TECHNIQUE WITH THE DRIVER
- The backswing is done by turning your back to the target to wrap around the trail leg bringing your weight on the inner side of your trail foot, but without cocking the wrists in the first half of the backswing.
- Avoid bending the lead elbow during the backswing, otherwise you will tend to “split wood” (and dig) instead of describing a nice arch flattened at the base. However, the trail elbow must bend.
- The head moves to the trail side during the backswing, but does not rise. To do this, be careful not to unbend your knees and hips. You should also perform a lateral flexion at the waist level halfway on the backswing as well as halfway on the follow through, otherwise your torso will rise. This is called “maintaining the angles” of the initial posture throughout the swing, which allows you not to stand up.
- At the top of the backswing, use the trail leg to push against the ground and rotate the pelvis to shift your weight to the inside of your lead foot. To do this, the trail knee must have been kept in its initial position (between the two feet) during the backswing to be able to push with the inside of the trail foot on the downswing.
- Keep your head behind the ball as long as possible on the forward swing to increase the force of the whip and to avoid hitting under the ball, which would produce a too high trajectory (pop-fly);
- Steps 4 and 5 will delay a little bit the turning of the trail heel on the downswing.
- Close the club head by crossing the forearms during the downswing, otherwise you will slice, because the shaft twists a lot during the downswing.
- Try and follow the ground with the head of the club after impact to increase the force of the impact (as if a nail was tucked horizontally into the ball), which also produces a lower trajectory and, therefore, more distance in the air and more ball roll after landing.
- The head turns after the impact (so you watch the ball fly away).
- Finish: At shoulder height, arms raise the body and the elbows bend, while the head turns towards the target. The shaft of the club ends its swing resting on the lead shoulder. Hold this position for several seconds to promote balance and, therefore, consistency.
3.5 IMPORTANT POINTS TO REMEMBER DURING THE SWING
- Your lead heel should not lift, because the lead foot is your anchor to the ground; the anchor allows you to have a solid, reliable, and repeatable swing at will.
- The trail elbow bends on the backswing, but not the lead one.
- Do not “scoop” the ball, that is, try and lift it with a movement of the wrists, the elbows, or the pelvis. Rather, swing down and let the angle of the blade (the “loft”) lift the ball.
- BEWARE OF CROCODILE ARMS, that is elbows that bend on impact when trying to hit hard with your arms, because then the biceps contract and you will top the ball.
- Both elbows bend at the end of the swing (called the “finish”).
- The trail foot should be silent; to do this:
- Halfway on the downswing, draw the trail knee towards the lead knee and then pivot at the base of the big toe of the trail foot.
- Finish on the tip of the toes of the trail foot.
- Swing with an inverted empty basket of balls leaning against the trail heel without moving the basket. You can replace the basket with a long tee planted in the ground.
Read my post on how to tee off with the driver.
3.6 SUGGESTED DRILLS
Super-slow motion for proprioception Drill
Do the swing in super-slow motion with no ball to develop the right reflexes: the order of performing the movements with the various parts of the body is more important than the speed. This is how you improve your proprioception (awareness of the various parts of your body in space). Over time, you will come to instinctively know where the ball is in your swing, much like bringing food to your mouth with a spoon, which you can now do with your eyes closed with great precision.
The “swishhh” Drill
Swing the driver without a ball gradually increasing the sound of the “swishhh” made by the driver’s head to increase your swing speed and, therefore, the “carry” (distance traveled by the ball in the air). You must make a complete swing and hold the finish on the lead foot several seconds and in perfect balance for this drill to be effective. Centrifugal force is used (turning the pelvis and shoulders towards the target) to automatically trigger the whip of the arms and shaft.
Three taps with the trail toes on finish Drill
To check if the weight is transferred to the trail foot at the end of the swing and to improve your balance and, therefore, your consistency in golf, slowly tap the ground three times with the tip of the trail toes at the end of the swing.
3.7 BETTER A SLOW THAN TOO FAST TEMPO
To improve your rhythm and tempo, count 3, 4, 1, 2, 3 and PAF! Start the backswing on 2 and make the transition (change of direction initiated by the rotation of the pelvis towards the target) on the “and”.
3.7.1 SMART PRACTICE
On the driving range, pretend you are playing a hole of golf. Go through the whole routine, changing target and club with each ball.
« Swing Fan » drills for more distance.
3.8 FORE !!!
Do not forget to shout “Fore!” if you baldly mishit and your ball goes towards people. If you hear a “Fore! “, quickly cover your temples with both hands and turn your back where the cry is coming from. Above all, do not succumb to the urge to look in the direction the scream is coming from hoping to see where the ball coming, because everything is happening too fast and you risk getting the ball in the face instead.
B) INTERMEDIATE LEVEL: 3 OTHER TECHNIQUES
4.0 CHIPPING
You can chip with or without cocking the wrists, and with or without forearms rotation to produce the backspin and topspin effects.
4.1 THE ADDRESS POSITION FOR THE CHIP
- Both feet are barely one foot’s width apart, aligned left to the target for righties (aligned right to the target for lefties) but the blade is aiming at the target. Therefore, the pelvis is opened, but we can create tension between the shoulders and the pelvis by bringing the shoulders back parallel to the targ.t line (flight line);
- The ball is facing the right breast for righties (left breast for lefties).
4.2 CHIPPING TECHNIQUE
- The engine is the shoulders rotation. The pelvis lets itself be carried along by the shoulders (it turns a little), but no foot lifts during the whole swing.
- On the backswing, you can cock the wrist (as Phil Mickelson) or not (as Steve Stricker); Keep your arms straight (do not bend your elbows, not even your trail elbow).
- Head still, nose pointed towards the ground all the time (do not watch the ball fly away).
- As a target, choose a drop point on the green. After falling, the ball rolls to the holee or slightly beyond.
- Control the distance with the tempo. A slow tempo produces a short backswing and, therefore, a short trajectory, while a fast tempo produces a long backswing and, therefore, a longer trajectory. The downswing must be done with a slight acceleration of the same intensity regardless of the distance because it is the length of the backswing that determines the speed of the stick and, therefore, the length of the trajectory.
- Side bend finish (trail shoulder points towards the ground where the ball sat) and the blade is close to the ground since no “scooping” action with the wrists, elbows, or pelvis to help the ball up occurred.
4.3 SUGGESTED DRILLS
Guess Your Chip Distance Drill
Without looking at the ball flying, try and guess if your chip was too short, too long or just the right distance.
Flamingo Drill
Chip on the lead foot in the flamingo position (with the trail foot resting on the tips of its toes) to feel the absence of weight transfer during the swing. The weight is always on the lead foot, it is not transferred to the trail foot during the backswing.
Humming Drill
Like Jack Nicklaus, chip while whispering the sound of a bumblebee with your mouth closed (humm…). The whisper should neither cease nor fluctuate in intensity, indicating that the swing is smooth and relaxed. Think about the gesture you would do to make a butterfly fly away (ssswishhh!), not the gesture to crush a mosquito (pafff!).
Combine the Flamingo and Humming drills above.
Read my post on chipping.
5.0 THE BUNKERS
5.1 BLAST BUNKER SHOT FOR GREENSIDE BUNKERS
- Open alignment of the feet.
- Feet wide apart and flared out.
- Low stance (very bent knees).
- K Posture a bit exaggerated.
- The ball is facing the left breast (for righties).
- More or less pronounced opening of the blade depending on the nature of the sand (fine or not, dry or not, deep or not);
- Takeaway without rolling the wrists to avoid the shank in shallow, hard or wet sand.
- During the forward swing, keep your head behind to use the rebound as much as possible and thus prevent the blade from sinking (in fine, dry, and deep sand).
- The point of contact with the sand is approximately 2 inches (5 cm) behind the ball.
- The trail shoulder must follow through the ball.
- Low blade in post-impact, without getting up or having raised the trail heel if possible (you must turn your shoulders and pelvis as much as possible, however).
Two Lines in the Sand Drill
Draw two lines spaced the length of a dollar bill. Make swings to dig a hole between the two lines, then continue with balls centered between the two lines. The lead heel is aligned with the line on the target side.
5.2 GETTING OUT OF A FAIRWAY BUNKER
- Square alignment of the feet.
- Normal stance.
- The ball is facing the right breast (for righties).
- Square club face.
- No more than ¾ swing (use more club, a 6 iron rather than a 7 iron, for example), for more stability.
- Takeaway without rolling the wrists to avoid the shank.
- The point of contact with the sand is approximately directly behind the ball.
- The trail shoulder must follow through the ball.
6.0 PUTTING
7.0 BEFORE GETTING ON THE COURSE
Read the post on the « Playing Time » in my website.
C) ADVANCED LEVEL: NEW TOPICS
8.0 THE TRANSITION AND WEIGHT TRANSFER
The transition consists in bringing the trail shoulder closer to the trail hip from the top of the backswing to create space to bring the trail elbow in front of the trail hip during the downswing, allowing for an inside-inside club path.
Also, a good transition automatically creates the weight transfer.
9.0 CURVED TRAJECTORIES
Thanks to a good transition, the outside-inside club path is avoided, which makes it possible to correct the slice afflicting more than 85% of golfers, because all that remains is to close the blade sufficiently by crossing the forearms to produce straight balls or to close this blade more forcefully to create draws and hooks.
10.0 WEAK OR STRONG GRIP? (hands turned on the handle without closing or opening the blade)
- Weak grip for the short game (chip, pitch, greenside bunker). The line formed by the junction of the thumb and forefinger points to the chin for both hands.
- Neutral grip for the long game (half swing and full swing). The line formed by the junction of the thumb and forefinger points to the trail clavicle (the right clavicle for righties) for both hands.
- Strong grip for the tee shot with the driver. The line formed by the junction of the thumb and forefinger points to the trail shoulder (the right shoulder for righties) for both hands.
11.0 FIVE PRINCIPLES : centrifugal force, momentum, club lag on transition, weight shift, gravity
11.1 The centrifugal force created by the body turn makes the arms move
Moving the arms with body rotation Drill
With hands folded in namaste, give a Japanese salute, then bend your knees slightly. Press your hands above your kneecaps and push with outstretched arms to straighten your upper back. Let your arms hang loose. Finally, have your arms moved by turning your pelvis and torso back and forth.
11.2 The momentum to throw the arms to the top of the backswing
Throw arms up Drill
In the golf posture with a wood, but without a ball, throw the arms upwards using an acceleration of the rotation of the torso at the end of the backswing. Do not stand up for all that.
11.3 The club lag in the transition phase makes the arms whip
Lead Backhand Slap Drill
Pass the trail arm (the right arm for righties) under the lead arm and place the trail hand against the trail cheek. Make a backswing followed by a downswing and release the trail hand and arm while vigorously whipping the lead arm towards the target as if to slap with the back of the lead hand. You must feel as if the lead arm would tear itself away from your shoulder. This is how the ball is whipped towards the ground after using the centrifugal force produced by the rotation of the body. For best results, do the drill with a buddy. Clap his palm with the back of your hand. Your buddy’s hand needs to be low for you to be forced to stay hunched over in the final swing position. Watch the video on how to “crack the whip”.
11.4 The weight shift on the lead leg facilitates the follow through
Throwing a soccer ball at the ground Drill
On the lead foot in flamingo pose, throw a ball against the ground. This is how you must hit down on the ball.
11.5 The gravity helps the arms drop
Drop Your Arms Drill
Drop arms from shoulder height. This allows you to learn to wait for the club to drop from the top of the backswing and accompany it on the downswing.
Brush the Turf Back and Forth Drill
Swing back and forth brushing the grass in front of the lead foot. In doing so, apply the 5 principles: centrifugal force, momentum, club lag on transition, weight shift, gravity